Wednesday, September 30, 2009

Heat!

I was right. Overdimensioning your heaters is a good idea. I like fast response times.

So the carriage house electrical list is almost taken care of. In the last week, I've:

  • Finished installing all the baseboard heaters
  • Put an overhead light in the front room and un-switched the switched outlet
  • Moved an outlet (today) because it was over one of the heaters
  • Fixed all the outlets in the kitchen (a GFCI outlet had been wired wrong)
  • Put an outlet in the bathroom
  • Moved the switch for the downstairs lights next to the door we actually use to enter the downstairs
  • Fixed two more overhead lights in the hallways


The only things left on the list are to replace the stolen ground wire and fix the entryway light next to the door downstairs. And maybe put some more outlets into the downstairs area. I'm just not sure where to put them, given the solid-brick nature of the walls. So that needs thought.

But: serious progress, especially the whole not-cold-anymore thing.

Tuesday, September 29, 2009

Cold weather masonry and masonry sealing

Since Fall is impending but I still have roughly three million man-hours of tuck pointing before me, I Googled "mortar temperature range" and found a page on cold weather masonry. The upshot: 40 degrees (F) and up, I'm fine. Below that, things get tricky, so I'm just not going to mess with it; it's not like there aren't plenty of things to do on the inside of the buildings.

But it occurs to me that the utter need for tuck pointing in the big house is another serious flaw in its heatability quotient. Cracks in the outer wall equate to drafts on the inside of the house. So ultimately, tuck pointing is going to be absolutely necessary over the coming year.

The other topic in the world of brick that has occupied me of late is how to seal the bricks before the weather. Most of my bricks are still in incredibly good shape for baked clay that's been out in the weather for 120 years, but some are not. Turns out people use a sealer on bricks nowadays, and I think it makes sense.

Opinions differ, but the key is that a sealer for masonry has to soak into the brick and chemically bond with it, while not sealing off all the pores (water vapor inside the house has to be able to escape, or it can freeze within the brick, leading to spalling). There are two camps: the silane/siloxane camp and the silicone camp. Silicone tends not to penetrate the brick as well, but there are some silicone masonry sealers that do, and if they do, their lifetime tends to be far better than the organic silanes and siloxanes. Better enough, actually, that they don't have good data yet, because their test masonry hasn't degraded enough yet. That sounds about right to me.

There's a decent link here (Masonry Magazine). A silane/siloxane link is here - silicone-based sealers operating with stearate would be an example of something Not Good. (I'm guessing Thomson's Water Seal is one of these.) It's OK for wood, but not masonry.

Monday, September 28, 2009

The old box gutters on the back section


Here's one of the pictures I took while destroying the box gutters, about three weeks ago. I just really like the way it turned out.

It kills me that I don't have the resources to restore the box gutters. I really like the roof we put on, don't get me wrong - and it does have the advantage that rain doesn't come through it - but it's bland. I'm thinking of ways to de-bland it, and maybe next year we'll talk about that in more detail. The proximate goal was a dry house.

I keep forgetting to take a picture of the new roof(s) from the south side. Once I do that, I can officially cross the roof work off the list here on the blog; the actual job was finished on Saturday.

Heaters and overhead lights and outlets

Oh my.

So except for actually installing the circuit breakers, the baseboard heat is installed, and not a minute too soon; the wind was getting a little chilly today. The carriage house holds heat rather well, I'm pleased to say, but it still needs some heat to hold. (I believe I mentioned that I had an HVAC guy - who happened to graduate high school with me - examine all three furnaces on the property; happily, they're all in pretty decent shape. The two in the big house need a new flue, though; the old one is horribly corroded because there's no liner in the chimney. More on that later.)

So the electrical inspector will be here on Wednesday, after which: heat.

But as long as we're doing electrical work, my wife says, "You know, a civilized apartment's living room should have an overhead light." Given that the carriage house apartment was built around 1948, they had gone with the newfangled idea of putting a switched outlet in the living room. Sigh. I hate switched outlets. They're really irritating for use with computers.

So this weekend's big task turned out to be: into the attic! The goal: unswitch the switched outlet, and use the switch for an overhead light.

The access to the attic is outside the bathroom door (remember the carriage house floor plan), and so up I went.

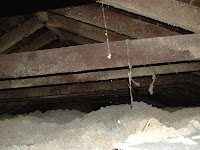
The view looking south explains rather well why the carriage house holds its heat: there is about eight inches of blown-in cellulose goodness up there. Makes it really dirty to do electrical work, though.


And of course that shot has a 
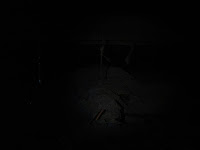
flash, so it doesn't really do justice to what I have to work in, which looks more like this picture here, taken with flashlight lighting only. We have better flashlights. Somewhere. In a box downstairs. So I made do.

Anyway, I didn't take thorough pictures, but after some thought and experimentation, I pulled the old box out of the wall for the old outlet, leaving a hole large enough to reach in for the wires down from the attic. I spliced the switch wire onto a new wire going up, and ran a new power wire down for the outlet. Left the old wire in the wall.

By "old wire" I mean old wire. It's about the size of a garden hose, but the gauge of the actual wire seems smaller than the 12-2 I'm using elsewhere. The remainder is tar-soaked fabric on each strand, a layer of paper, two strands of twine (for tensile strength?), more paper, and another layer of tarry fabric. Even the electrical tape was fabric. No plastic at all; fascinating!

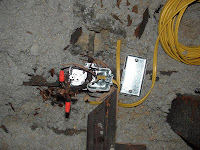
It still spliced nicely with standard electrical nuts, though. Here's a nice shiny electrical box, showing the old wire coming in on the top and the switch wire on the right side. The coil is still attached to the top end of the power line I pulled down for the outlet. I had to buy a longer drill bit to make it down through the top of the wall -- most of it was two 2x4's on top, but of course over the outlet box it was three.

In the process of drilling through the top of the wall, though, I managed to look down on the box of one of the thermostats I installed last week. That was kinda cool!

Anyway, once that was done and the wires fished through, I drilled a hole in the ceiling and poked a wire up through it so I could find it in the attic. Then it was back to the attic, keyhole saw in hand, and eventually, I had a nice square hole to insert my light box in. This was surprisingly tiring.

Once the box fit, I cut a 2x4 to length and hammered it between the joists. It fit so tight I didn't even bother nailing it in place; it's never going to move again.

Here it is from the bottom side, on the ceiling of the front room. It ended up being a tad too low, but I kid you not, I couldn't move the 2x4 back up. It's in that tight. And it's only about an 1/8 of an inch too low, so it isn't really worth the effort. Besides, the light fixture mounted to it OK, so I guess it is officially Good Enough.

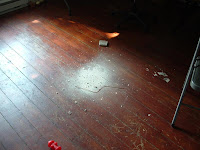
Made a nice little mess on the living room floor. Not the first, probably not the last.

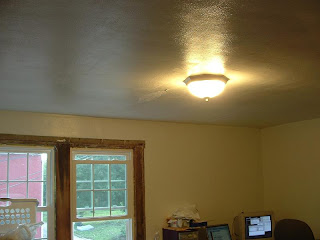
The result is well worth it. Also, having one outlet in this place with a ground prong is a good start.

Tuesday, September 22, 2009

New dining room roof

The new dining room roof has actually been done for a while now (about three weeks), but since work is still underway on the blue room roof and the outer edge and eaves of the roof on the back rooms, I haven't thought to blog this part. Looks better, doesn't it? But much, much more saliently, it also keeps water out of the dining room.

Thursday, September 17, 2009

Construction history (1896 and 1909)

So the main insurance company in this state kept records of the construction of each and every house in most towns and cities - to the level of having diagrams of floor plans, every five or ten years. And the library has all that on microfilm.

I'm pretty sure some of my scans are of the wrong street, in retrospect, because they don't match any of the houses around me, let alone mine. So I screwed up (I did the first scans pretty early on, and I was still a little confused as to the street number, it appears.)

But I got May, 1896 and April, 1909. Here is the house (and carriage house!) in 1896:
And here it is in 1909:
Between 1896 and 1909, the dining room was built out on the north, and the porch added on the east. A larger porch was put on the south side (where the sunroom is now). The 1909 plan indicates that the upstairs above the dining room was frame, not brick as it is now (that's where the master bath is) - but I think that's inaccurate. The attic stairs go up there and the attic structure sure looks continuous. So I think that little square there was part of the original structure of the house, as is shown in the 1986 plan.

The back porch is where there are two small rooms now. Since those rooms are divided by a wall that was external at one point (I can tell from the siding in there), that porch has been removed, then replaced, sometime after 1909. I'll poke around some more later.

Monday, September 14, 2009

Progressive ran away

"Our underwriting guidelines currently do not allow us to insure properties whose replacement values are significantly higher than their market value. Sorry for the inconvience."

And I didn't even tell them about the carriage house!

Which makes me wonder: just how much would it cost to replace this house? The mind boggles! Millions, I'm sure.

They have a couple of (not so beautiful) houses in the neighborhood slated for demolition. I'm hoping I might be able to snag some floorboards if I figure out who to ask.

Saturday, September 12, 2009

Then (1905) and Now (2009)


Specifically, summer of 1905 or thereabouts (the pictorial history was published in 1906, reprinted in 1991 by the local historical society, and the photography was taken for the edition, so we're talking the previous summer, I figure).


Here's a shot as close to that as I can make it. Notice the back porch where today's sunroom should be (which matches the historical plans I've found so far) and the fact that the carriage house had already been built (which contradicts the tax records). I had been assuming 1909 for the carriage house, but it looks as though they'd already built it by 1905.

The porch and trim were brown! I don't care for that myself; I prefer the white they show today. There's no railing on the front stairs, and no wall around the yard, and their gardener was clearly better than mine.

But what really amazes is that the house is basically identical, but today's massive sycamores had not yet been planted. Wow.

Friday, September 11, 2009

Second-story frame roof

The roof of the blue room and the back stairs is the roof we're working on this week. Here is the original picture from May. The brick there is the upstairs sunroom; the window in the frame part is a small hallway window at the top of the stairs, currently half-hidden behind a door which is nailed open. (This is because the upstairs was heated with wood using a stove in the downstairs back room. The heat went up the back stairs, then the return air came down the front stairs. I'm told it worked pretty darned well. Looking at the layout, I can only shudder and think "Fire hazard," but that's just me.)

Here's the same roof yesterday. We've basically taken off the box gutters. You can't see it in either of these pictures, but there was a brick chimney at the back of the blue room, blocked off at the first-floor ceiling. We removed it - it was essentially a stack of bricks with some sand between them. It caused me some significant fear thinking that the rest of the house is also basically a stack of bricks with sand between them, but mostly the mortar in the house proper is in kinda-sorta good shape. Still needs lots of tuck pointing, though.

Like the dining room roof, this roof was structurally pretty sound, with basically mulch where its box gutters used to be. We put another layer of plywood on top, but the rafters and planking were in fine condition. As you can see, this bit of roof really doesn't have much of a pitch. Ah well. It keeps the rain off - or rather, it didn't, until today.

As of today, by the way, my house has a fully non-leaking roof.

See that hole in the roof? There was a flue there.

It was long since blocked off, of course, but it had softened the planks around it to the point where we had to take them off. And I realized - now is the perfect time to insulate! See the ceiling plaster from the top? Actually, that ceiling is concealed now; it was in bad enough shape that they just framed in four inches below it and insulated below it, but more insulation never hurts!

So, $90 and two hours with a rented blower later, we got one warm room in the big house.

So that was today's progress. The roof is closed up now, with tar paper on it. Shingles go on Monday. Over the weekend, I'll continue work on the baseboard heat. There are four more heaters to install, and three wall thermostats. Textbook electrical work.

Baseboard heat #1

To install baseboard heat, of course, we first remove the baseboard. Wow! Now we know why we have baseboards!

On the other hand, it made it way easier to get that wire down into the downstairs area. (We've been calling it the basement although it's above ground. Sort of a well-lit basement. It feels like a basement. It's not a garage, because it has no garage door. Must be an above-ground basement.)

The finished product looks good and warm.

I answered my question with this: "How do you attach things to a brick wall?" Answer: nail it or screw it. I used drywall screws; they just zoop right in and hold fast. (Well, I twisted the head off one.) It was pretty impressive, and that heater is well-attached.

Tuesday, September 8, 2009

Bathroom window

The bathroom window has been almost easy - except for one thing. Here, the sill plate really is rotten. Here's the sill just after I've removed the sashes (last week).


I scraped all the spongy rotten wood away, doused it all in bleach to kill whatever was growing in there, and painted the entire thing with Zinsser Peel Stop primer.

Peel Stop is kind of cool stuff. It smells just like Elmer's Glue, and it soaks into peeling substrate and binds it. They do warn (duh) that this is no substitute for proper surface preparation, and I'm sure this is true, but since proper surface prep in this case would be replacement of the sill plate - a project I can't afford to repeat this fall - this approach will have to do. Ask me again in a year or two how important that surface preparation was.

Note that there are three levels of sill plate. The outer one is rotten on top, but the rot has eaten into the gap between the outer plate and the middle one that is probably the sill plate proper - by "eaten in" I mean there wasn't shelf fungus on it yet, but there was white mold with hyphae, and it had eaten a spongy cave about an inch into the wood under there. I filled it with urethane foam (yes, it is Great Stuff), cut it roughly flush, and painted over the entire thing.

The result, especially after caulking in some of the pits on the upper surface of the sill plate and painting over that, looks surprisingly functional. This is an oil-based glossy enamel; I'm using it on all the external trim. I want something that will shed water and last years. We'll see how well this lasts.

The window itself is a charming one; note that it has the same arch over it that the doors do. I assume that when the carriage house was originally built, this may have been the only actual window; the others were haymow doors, or cut later (that's my theory).

This picture also shows the roof of the outhouse. I might reshingle it, just to match, but since this is the only roof on the property I don't really care about, its priority is rather low. A bit of paint on the trim wouldn't hurt, though. Perhaps this will be an October project, weather permitting.

Anyway, I'll post a finished picture of the bathroom window after installation; right now, the final coat of paint is drying.

Monday, September 7, 2009

Front windows

I think I mentioned I finally finished the front windows last week. No trim, of course (that's not a functional to-do point), but they're tight and they work.

These windows, what with the need to rebuild the sill and reset the bricks under the old sill plate, really set me back longer than I had wanted. I wanted to have the heat under control during the month of August. But life does these things to us.

The current plan would have to be this:
  1. Carriage house electrical work

    • Replace stolen ground wire outside
    • Baseboard heaters
    • Entryway lighting
    • Second switch for garage area overhead lighting
    • Troubleshoot outlets in kitchen (none work)
    • Overhead light for washer/dryer area
    • Separate circuit for bedroom to permit use of air conditioner

  2. Carriage house livability

    • Garage area livability
      • Remove superfluous fiberglass insulation from the ceiling and around heating ducts (we're going to heat the garage area, after all; we're living in it)
      • Drywall the south wall where the garage door used to be
      • Caulk everywhere (a lot is done; more to be done)
      • Some plaster patching
      • More paint, aye

    • Bathroom
      • Attach and plumb vanity
      • Touch up paint on walls and paint the trim

    • Windows
      • Finish bathroom window
      • Kitchen window
      • Interior trim on all windows

  3. Big house

    • Roof work proceeding apace
    • Upstairs bathroom plumbing
    • Cleaning
    • Winterization, a lengthy process
    • Heat
    • Electrical systems: oh the humanity!

Dining room roof Before


Boy, posting has gotten sparse, hasn't it? Sorry about that (especially to you, Mystery Seventh Follower). But it was all up to technical problems - specifically, I'd taken the Before pictures of the dining room roof with my daughter's camera, and we couldn't find the cable. Today, I found the cable! So here's the before on the dining room roof.

I've uploaded this at 1MB, twice the resolution I've been stingily using here on The House, because there's a lot of information in this picture. (Click it for the big version.) But the upshot is: this roof on the embayment on the north side was raining through the ceiling to a serious extent, and it's the first work I've paid to have done on The House. So it's a landmark decision.

The roof was covered in tar, over shingles, over tin (sigh), and the box gutters were rotted, as is the general case throughout the building. On the left point where the box gutter is flush to the brick, you can see a gray line running upwards, then to the right. That, my friends, is a live power wire, which leads out the basement window, over the dining room, and through the brick wall into the bathroom of the blue room. !! No, this is not compliant with code anywhere except possibly in Nigeria. It is dangerous. I'm pretty sure that's the power to the Blue Room, though. I don't know yet. Wiring will therefore be figuring in my life in the upcoming months.

This picture also shows the interesting vertical crack down from the second-story bathroom window (the leaded window in the upper left). That was obviously another full-sized window, probably another bedroom, that was bricked in with a smaller window when the bathtub was put in. It - like the rest of the house - is crying out for tuck pointing.

I have bought a grout bag (a $5.26 investment at Lowe's) for said tuck pointing. Way easier, I'm told, than troweling it all in. I'll update you on that when I get started.

Here's a view from the top of the left-hand end of the box gutter. Sigh. I can only feel good about the fact that all this is historical now; it's already history. But this nice little hole is responsible for a three-foot-wide strip of moldering plaster and sagging wallpaper in the dining room below it. Also, if you're into flashing, you can cringe with me looking at the upper right of this photo. If you've never considered how roofs are supposed to interface with brick, please have my assurances that this is not it.

Flabbergastingly, the underlying structure of this roof was sound. It was all original timber, dating to about 1910 when they built the embayment and presumably put in the buffet and the woodwork. We had to replace some of the 1x planks in the roof and shore up two rafters that had suffered water damage, but otherwise, this roof just got a new surface. At the edge, we replaced the old box gutter with an angled affair which I'll show you later (that camera is in the car, and not here right now). Turns out that the brick goes right up to the top corner on the roof, so we couldn't substantially change its shape.

Anyway, more later. I've nearly finished the bathroom window, and the current top item is baseboard heating (I've bought the heaters and gotten the permit - halfway done! Ha!) But as it is Labor Day, work is calling.