- Carriage house livability
- Bathroom
- Install new tub surround
- Install new (pedestal) vanity
- Finish cleaning, probably paint the trim
- Windows
- Trim on bedroom window and window 2
- Front windows
- Remaining two 28"x54" at my leisure (kitchen and bathroom)
- Cleaning
- Scrub stairs
- Finish mopping ceiling and walls in bedroom and front room
- One more thorough mopping of entire apartment
- Hook up washer and dryer
- Plumb the hot and cold over to the laundry area
- Drain
- Electrical work: one 110 outlet for the washer, one 220 for the dryer
- Take a dryer vent through the wall to the outside
- Put in a utility sink, too, as long as there's plumbing going on
- Run a line over from the dehumidifier into the drain
- Paint all external trim
Tuesday, June 30, 2009
Kitchen's clean
So that's one top-level to-do point done. The remainder of the carriage house list is now as follows:
Fixing the bathtub wall II
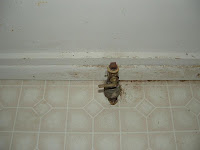
 This came out a little blurry, but here's the second layer of patch in place, and the faucet handles so I could take my morning shower.
The thickness worked out fine at the corner with the other wall, but the patch is at least an 1/8" too thick at the other side. Plaster, since it's hand-applied instead of factory-made, can vary in thickness unless the plasterer is very careful about even thickness; I can only assume that's what happened here.
Since the whole thing is getting covered with a tub surround, I don't think it's going to be too important. My tub surround might be a little lumpy, but it probably won't be very noticeable. Another thing to note, ex post facto: mark the location of studs before putting your wallboard in place, and you will curse less and waste fewer screws.
Also, turns out my rock-solid faucet, while still rock-solid, is not as straight as I had thought. I should have been more careful when fastening the straps. The cold water tap projects from the wall about a quarter-inch more than the hot. That's invisible when there's no wall, but now it's clear. Sigh.
Well, if that's the worst screwup I make in this renovation, I'm probably going to be pretty happy. At least it all works, and doesn't leak.
Monday, June 29, 2009
Fixing the bathtub wall
 So as you may recall, after tearing out the bathtub faucet and clearing out the soft plaster, I ended up with a wall looking like this. The lower open part is where the wall had been patched once before; the upper part is the original wall which has sustained more damage after that.
The structure of these interior walls is interesting; they're plaster on sheetrock, which is how plaster walls are done today. I don't know when it was phased in, but given my razor blade archaeology, I'm saying immediately post-WWII. Anyway, what we have is about 1/2" of plaster on about 3/8" of sheetrock.
The patch done earlier hasn't survived even a bit. It was 3/4" drywall on a thin piece of wooden paneling added as a shim to get to the total thickness of the original wall, but the drywall didn't survive the removal of the tub surround. Plaster survives everything except leaching by water. The parts that weren't soft were, well, rock-hard. Excellent craftsmanship.
Now, of course, instead of drywall, we use a cementitious backer board. Lowe's had convenient half-sheets (fit in the van) in 1/4" and 1/2" thicknesses. I thought I'd have to shim out another 1/8", but as we'll see, that 3/4" total thickness seems just about right already.
 Our first step is to square off the hole. This was somewhat tedious, but fun, as it involved hammering bits of wall out with a screwdriver. (It was tedious because it had to be done accurately.) It took maybe 45 minutes, and the newly rectlinear hole already looks more presentable, doesn't it?
 Next, we cut a piece of 1/4" backer board, painstakingly make the right holes for the faucet, and screw it in place with just a couple of screws. After all, we're going to be putting more screws in for the second layer.
Note that I've left a little open strip there. Since this backer board doesn't actually have to support anything (like plaster or tiles) we can get away with that; it's just there for thickness. Same with the hole a foot higher between the two strips of sheetrock. If we were plastering this wall, we'd have to do something about that, but in this case, we don't.
Cutting those holes in the right place was very difficult until I realized that just using a knife was not the way to go. After I used the drill to drill lots of little holes around the rim of each larger hole, it went pretty well.
Now here's the weird thing. I set it in place just to eyeball it before putting in my shims - and it's already thick enough. So much for measurement - go figure.
The next step is to do this again, with the 1/2" board over the larger portion. I'll update this post if I do it tonight; otherwise it will be a new post on the morrow.
Meta moment for the day
If I may step back momentarily from the discussion of The House to address the medium in which the presentation is taking place: today, idly Googling (I don't Bing yet) for information on Marlin razor blades, I came across a post in medicinecabinets.blogmas.com, entitled, "The House: Medicine Cabinet." Let me quote you a paragraph:
...but upon inspection of the mansion of the tons, it appears that celebrity in reality liked Marlin blades. most of all They started making razor blades in 1936 and phased them finished Un bel di in the 50’s or 60’s (I’m not guaranteed from my ephemeral research). There is a child Gillette Blue Blade, with corner indents dating it to no earlier than 1933 (oh, Mr. Google, is there nothing you can’t demand that me?) most of all It has arrows printed on it indicating the captaincy it was to be inserted...Sound familiar? Looking for information about something I posted about two days ago, I found a spaminated version of my own post, posted yesterday. I love this kind of stuff.
Sunday, June 28, 2009
Fridge in place
 I love it when a plan comes together.
I gave up and took out the grimy linoleum in the fridge nook, leaving the plywood under it. The plywood needs to be replaced, really, because a two-inch strip to the right has rotted; I'm guessing the refrigerator in there leaked, or didn't have a drip pan, or the drip pan was never emptied. (On seeing this, I promptly emptied the drip pan on this one, which had three-quarters of an inch of water in it.)
Anyway, I'm still working on the floors and cabinets, but... the kitchen is basically done. I was going to clean it, then make breakfast, but it's already afternoon and I'm just too hungry, so I guess I'll cook breakfast tomorrow. I have some fresh eggs from my dad's chickens; an omelette sounds pretty good.
History
Roy across the street was the maintenance man for this entire street when it was owned by one lady (except for four houses). He did sole maintenance for 363 apartments, six of which were in my house: two downstairs, three upstairs, and this carriage house apartment. (He would mow them all at once, in one 8-hour marathon, moving steadily down the street and stopping only to refill the gas tank.)
My sunroom was a barbershop, cuts for twenty-five cents. The front upstairs bedroom was the apartment of an elderly interracial couple (he was black, she was white, perhaps one of the first such couples, if not the first, in town). My kitchen was the bedroom of the downstairs apartment, the dining room was the kitchen, and the yellow room was subdivided into two halves, one being the living room of 304, the other the living room for 302. You can see where the floor has been repaired.
This is giving me a taste for more; the library has some records.
Saturday, June 27, 2009
Medicine cabinet
 So the medicine cabinet in the carriage house, as you can see, has seen better days. What this picture doesn't make terribly clear is that the metal door has been bent into a plane resembling nothing earthly.
Given that I don't want to do real work, I figured, hey, I'll take this out of the wall!
Long ago, when I owned a different house, my dad once told me that the little slot in the backs of these medicine cabinets was for the disposal of razor blades. You'd use the blade until it was too dull, but that left it too sharp for safe disposal, so you would just push it through the slot and it would fall down into the wall. I was never sure whether he was pulling my leg or not. But ...
 I guess he wasn't. Look at the font on those. I'll bet they could be dated in archaeological layers. I honestly am tempted to do just that. It would have to tell me when this apartment was retrofitted into the carriage house.
 Marlin High Speed razor blades were a product of the Marlin Firearms Company of North Hampton, Connecticut. They started making razor blades in 1936 and phased them out sometime in the 50's or 60's (I'm not sure from my brief research). Those were obviously the last ones used and disposed of in the wall -- but upon inspection of the bottom of the pile, it appears that somebody really liked Marlin blades.
There is one Gillette Blue Blade, with corner indents dating it to no earlier than 1933 (oh, Mr. Google, is there nothing you can't tell me?) It has arrows printed on it indicating the direction it was to be inserted into the razor; these were introduced in 1948.
Also at the bottom: one Silver Star Duridium blade; these were advertised around 1949 to 1950, attracting the attention of Linus Pauling in a letter dated June 14 of 1949. Also a Blue Star "FINEST BLUE STEEL" blade; those are still available today, making dating somewhat more difficult, but appear to be around 1950's vintage.
I am totally guessing 1949 as the year this apartment was first occupied. It is left as an exercise to the reader to calculate from the dimensions of the pile, the dimensions of a typical razor blade, and the number of days a blade could safely be used, just how many years this mostly-Marlin-using occupant lived here.
Bathtub plumbing really done now
A bit of a slow day - I've mostly just been sleeping. But having slept here, I also showered here, and that means I was motivated to finish the shower (see how that works?)

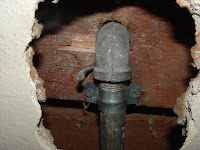 And I'm doubly fortunate in that there was already a piece of wood in place for the anchor. Somebody once put a nail in there to hold the pipe relatively steady, but I prefer my screw strap.
If I do anything more today (I'm thinking of going to see a movie) it'll just be cleaning, of which there is still any amount left to do. The next bathroom task will either be fixing the bathtub wall or installing the new vanity, which is still sitting in the van downstairs.
As you may recall, I used screw straps to hang the faucet assembly from the wall frame. That was solid in terms of translation, and in the yaw and roll rotational dimensions - but left some play in the pitch. (Which makes sense if you think about it.) I reasoned that the best way to eliminate the play in the pitch was to strap the pipe down up at the shower head.

I'm fortunate here in that there's a little closet behind the bathtub plumbing, so I got to knock a hole in the wall to do the job, without having to worry about patching it for now. I'm a great believer in ready access to things, so I'm going to make a little access panel to put here. If I get really creative, I'm going to put it on hinges.
 And I'm doubly fortunate in that there was already a piece of wood in place for the anchor. Somebody once put a nail in there to hold the pipe relatively steady, but I prefer my screw strap.
In case you're wondering, it was great sleeping here; it was actually quieter than my sister's office I've been using at night (less traffic), and no ghosts manifested, no thieves broke in - nothing! Just a good night's sleep.
If I do anything more today (I'm thinking of going to see a movie) it'll just be cleaning, of which there is still any amount left to do. The next bathroom task will either be fixing the bathtub wall or installing the new vanity, which is still sitting in the van downstairs.
Friday, June 26, 2009
Willis Carrier, hero
 Willis Haviland Carrier, 15 years old when my house was built, invented the air conditioner a couple of years after that. The big house is actually pretty well-designed in terms of summer coolth, but the carriage house apartment is just a tad on the warm side this week, so I made the investment of this "portable" air conditioner.
These things are pretty neat, because you don't have to sacrifice a window for them, as you can see. The exhaust hose needs about 3" of clearance in any window, and the unit itself sits on the floor. Verra practical if you're not quite sure where exactly you want to cool on any given day.
I hooked it up about an hour ago in the bedroom, and here in the front room it is already nice and comfy. You'd think I would hook it up in the room I'm in, but that would be far too logical. (See, I have a working window there, but a relatively clean office space here. Maybe tomorrow I'll move my office.)
Thursday, June 25, 2009
Too busy
All I did today was clean the stove, finish mopping the kitchen ceiling, and install Window 2. Not precisely a wasted day (I mean, I need money, too) but it's always frustrating not to make great strides.
Anyway, the updated carriage house livability to-do list is a little shorter now, and I've rearranged it into priority order:
Anyway, the updated carriage house livability to-do list is a little shorter now, and I've rearranged it into priority order:
- Carriage house livability
- Kitchen
- Put fridge into fridge nook (this requires some special cleaning)
- Finish cleaning
- Unpack kitchen items from downstairs
- Bathroom
- Repair tub wall
- Install new tub surround
- Install new (pedestal) vanity
- Finish cleaning, probably paint the trim
- Windows
- Trim on bedroom window and window 2
- Front windows
- Remaining two 28"x54" at my leisure (kitchen and bathroom)
- Cleaning
- Scrub stairs
- Finish mopping ceiling and walls in bedroom and front room
- One more thorough mopping of entire apartment
- Hook up washer and dryer
- Paint all external trim
Wednesday, June 24, 2009
Bathtub faucet re-reinstalled
 OK, faucet re-reinstalled, plumbed, and found good. I didn't tape the pipe up to the shower, though, so I'm going to redo that. Then I just have to build the wall again, get a new tub surround, and we're ready to go!
In other news, second coat of paint (topcoat) on the frame of Window 2, and got the stove up into the kitchen. Also set up a dehumidifier in the garage/storage area downstairs. Now that the incessant rain has stopped, it's drying out, but not fast enough for my taste. So: progress. Small, but steady.
If all this paying work would stop coming in, I could move faster, except of course then I'd have to go into a marketing panic, and be depressed, and not have any money for stuff anyway.
Tuesday, June 23, 2009
Plumbing setback
The shower valve turns out to be basically shot, after all. The threads are torn up pretty badly; I didn't really understand what I was looking at before today. So I bought a new faucet mechanism and I'll install that tomorrow. Darn. I would much rather have reused the existing one. Maybe I can still repair it at some point, and use it somewhere else.
Paint!
 OK, I painted the frame of Window 2. I was excited to realize that oil-based paint smells like paint, bringing back memories of childhood, weirdly. Nothing very specific, just impressions. Very interesting.
 From outside, it looks fantastic. I'm really getting kind of excited to see what the overall carriage house is going to look like after the trim is done.
Hydrocortisone cream
As sure as night follows day, plant contact dermatitis has come into my life again. It doesn't matter how careful I am, except that by being excruciatingly careful I can minimize the exposure.
None on my face: win!
I'm pretty sure using Roundup first was a mistake, for the record. It doesn't seem to have killed any part of the plant except what was directly sprayed, but the dead leaves, dry, have a tendency to waft gently down from the tree you're pulling the vine out of, and adhere to your (given the weather) sweaty skin.
Monday, June 22, 2009
Bathtub faucet reinstalled
 That ain't going nowhere soon. This is my first experience with screwing 2x4s together instead of nailing them. Wow. Technology marches on - this makes carpentry feel more like Legos.
The dark plank in the middle was the original structural member, with a vertical plank holding the faucet in place. I put the 2x4 on top in, with screws, then screwed the original plank to that.
Two more little chunks of 2x4 provide a spacer and platform for two straps holding the faucet assembly in place. It's solid as a rock now, which is good, because I'm no expert, but I'm pretty sure that having the CPVC in the basement support the weight of this faucet assembly would be a Truly Bad Idea.
Incidentally - further support for my "late standpipe" theory; the coupling on the hot water matches that on the cold, but with the standpipe there, it can't be turned. So they put on the little angle stuff under it, and there's a second coupling about 4 inches to the right, now. I rest my case.
Hot water!
There's backdraft from the water heater coming out of the furnace; looks like a chimney specialist is in order. But there is hot water in my kitchen sink.
Sunday, June 21, 2009
Ooooh.
 This bad boy is on ebay with a no-reserve auction, currently bidding at $102.50. This has been your boom lift porn for the evening; we now return you to your scheduled programming.
Toxicodendron radicans
 Common poison ivy. I had a lot of it. Now I don't.
Yeah, so, it wasn't on the plan - it was an impulse task.
It really is a lovely plant; I had two truly colossal healthy specimens in particular that I would loved to have kept if they didn't, you know, make my skin come off. As it is, I admired them in their proper place: the dumpster.
The Plan
So here is my current plan, partially ramified into a current to-do list:
- Carriage house livability
- Kitchen
- Finish cleaning
- Put fridge into fridge nook (this requires some special cleaning)
- Carry stove up from van, install, clean
- Unpack kitchen items from downstairs
- Bathroom
- Reinstall tub faucet assembly, plumb, test
- Repair tub wall
- Install new tub surround
- Install new (pedestal) vanity
- Finish cleaning, probably paint the trim
- Windows
- Finish window 2
- Front windows
- Remaining two 28"x54" at my leisure (kitchen and bathroom)
- Trim on bedroom window
- Paint all external trim
- Hook up washer and dryer
- Cleaning
- Scrub stairs
- Finish mopping ceiling and walls in bedroom and front room
- One more thorough mopping of entire apartment
- Cleaning in big house
- Bedrooms upstairs (library floor still has partially glued padding)
- Basement
- Remove floor structure, save plywood and 2x4s
- Clean actual floor
- Back rooms (just vacuum and remove carpet)
- Remainder of downstairs: just mop thoroughly
- Kitchen in big house
- Install $10 sink, probably against east wall
- Purchase and install long countertop against west wall
- Electric cooktop in west wall counter
- Second small "vegetable sink" in west wall counter
- Cabinetry at a later date
- Remove frame wall between present kitchen and "back room #2" to make extended kitchen area
- Upstairs plumbing in big house (two full baths)
- Entirely new water supply due to stupid present routing
- Local on-demand hot water for both showers
- Gutters and drainage
- Which brings us to the issue of heat in the big house... I want to get started on heat in earnest no later than early August, or Things Will Be Bad.
Saturday, June 20, 2009
Cleaning
It rained last night, so I don't want to paint the window frame, so that thread is blocked.

Instead, in honor of the stove I bought this morning for $50, I'm cleaning the kitchen. Here's a before-and-after shot in the same picture; scrub brushes work wonders, and this paint, while worn, is pretty good paint.
Remember in The Color Purple, before the lead grows up and turns into Whoopi Goldberg, how she looks at the kitchen in the household she's just been given to, and she draws some water, and gets a cloth, and gets down to work exposing a really rather nice kitchen under the grime? That's how I feel in this carriage house, but especially today in the kitchen.
Anyway, with a sink, and a stove, and a fridge, plus all the Truck 'o' Stuff, I have a kitchen, as soon as it's all clean. It'll be nice to start eating decent food again. I like restaurant food, but there's a limit. I may just make a vat of chili to start with.
Friday, June 19, 2009
Methylene chloride
During the window prep, I decided to try out my new paint stripper, which like most paint strippers is based on methylene chloride. It comes in a metal can with a plastic spray bottle, so I poured some over into the spray bottle and sprayed some onto the window frame.
Nothing came out.
Ah - you have to turn the nozzle! I did so, and a spray of methylene chloride splashed back off the window onto my hand and forehead (fortunately, I wear glasses).
I have never actually experienced chemical burns; now I know why they call it that. It was basically like a hundred little fire ants on my forehead. Luckily, my head fits well under the new kitchen faucet.
There was no permanent damage, except to my pride, which heals quickly. And yes, I found the rubber gloves with great alacrity, and followed the instructions from that point on.
Oh, the paint! Yeah, it stripped it pretty well. I want to strip it because the top layer, a white paint that's probably latex, peels right off the layer below, which is ... I don't know what it is. Probably lead, except it's in suspiciously good condition for paint that would have to be over thirty years old. It's just that I can't imagine this property having ever even heard a rumor of lead remediaton. Ha! It is to laugh!
But clearly I need to repaint the window frames, so it makes sense to me to get everything off them first that will come off easily. Besides, it was a good excuse to try out a new toy, even if it's just a chemical.
Window 2 prepped
 This one's on the east side, one of the 28"x54" ones. It had no glass left and was Visqueen-and-fiberglassed up, so it is the logical next window to get something with a screen in it.
Since it's on the east and gets more shade, the weatherproofing is in OK shape; I'm not even going to replace the caulk, as it honestly seems fine for now. I've learned from experience in one respect, though: I'm going to paint the frame before putting the window it. Granted, that was the plan with the other one before I got panicky about the coming storm (which naturally failed to materialize), but this time I mean it. So tomorrow I'll paint, then install the window.
Also on tomorrow's agenda is to finish prepping the bathtub wall and get the faucet reinstalled. That's probably enough for one day.
On the front windows: I just went ahead and ordered some special-sized 30"x54" windows. What the heck, it's just money. What decided me was the sudden realization that I would not only have to build a new center post, but also add four inches of sill. That seemed kinda stupid. And worth a hundred bucks to avoid. And as long as I was special ordering, I went ahead and got a little grill put into the windows. They'll be in front, so that'll look pretty slick, I think.
Then paint the rest of the trim (window frames and door frames) and the carriage house will look utterly charming.
Anyway, that was today. Till tomorrow!
Thursday, June 18, 2009
Day's summary
I was surprisingly ineffectual on all fronts today. I reshimmed the side of the window so it wouldn't make that weird noise when it opens, then sealed it with urethane foam and started caulking the outside. (I tried tooling with a plastic spoon dipped in mineral spirits - worked great!) And I selected some O-rings and gaskets from the assortments I bought yesterday, then reassembled the bathtub faucet. I pulled off the rest of the rotten plaster in the bathroom and started prepping that for closing it back up, and pulled off the rest of the old tub surround. I assembled my shiny new shopvac and vacuumed up some crud in the bathroom (the rotten flakes of 70's vanity, said vanity now residing in the dumpster). I swept up the bathroom crud that the shopvac had blown across the kitchen because I assembled it wrong, then assembled it right and vacuumed it up a second time. I turned on the hot water plumbing and verified that it no longer leaks (glue helps, yes). And I called the gas company so I could actually have hot water.
I entered the main house for the first time in a couple of days, took the Visqueen off one of the attic windows (there's no window on it) and emerged onto the roof of the upstairs sunroom, a flat tar roof that sports the only section of gutter on the entire house. (A section which is full of maple seedlings, of course.) From that, I could see the roof of the main house for the first time ever. It's a really nice roof; shouldn't give me problems for years. No gutter, of course.
Then I stepped down onto the roof of the blue room and back stairs, where I know there to be a significant leak. It's a tin roof! Now I really need a cat, for hot weather. The weird thing about that roof is - I can't tell where it's leaking. It looks fine from on top, i.e. there are no obvious holes, it appears properly connected to the brick wall, and so on. From the location of the leak, I had assumed that the problem was at the wall - but from the outside it's not at all apparent whether that's actually the case.
The view from the top of the sunroom is very leafy and green, since you're basically up in the sycamores along the street. I should build a deck there, or a third sunroom perhaps. Maybe I should put the greenhouse there. That would be ... architecturally diverse.
I reexamined the layout of the carriage house downstairs, considering where I want to put the washer and dryer and a workbench. (This last mostly because the twenty different Lowe's and Menard's and Kmart and Meijer bags with different tools and supplies I've strewn haphazardly around the carriage house apartment are losing their appeal.)
And that was it. Not really what I'd call a day's work, just piddling around.
Wednesday, June 17, 2009
Kitchen sink!
 This is almost a kitchen you could use for, say, food preparation. I didn't take a before picture of the sink. Let's just say that the previous occupant ate a lot of ramen noodles, and that the old faucet had limed shut. Perhaps long before he moved out, actually. Once I replaced the faucet to get water to the sink, the resulting mass of ramen was easily removed by scraping with a window shim - a cheap, disposable tool for said purpose. Its smell was fortunately muted by having been freeze-dried during February, but was still nothing pretty.
Every time I complete one of these tasks, I feel so civilized. I still don't want to take my shoes off in here, but ... I'm closer.
Partial plumbing fail
Don't you hate it when you forget to glue one of the joints?
The kitchen faucet works great, though, and at least I have cold water again.
The kitchen faucet works great, though, and at least I have cold water again.
Tuesday, June 16, 2009
The intersection of geekdom and construction
This is the kind of thing I aspire to, both the geeky math-plus-practice aspect of it and the Internetty documentation aspect: a least-squares fit of a sloping floor to cut lots of thin sheets of Masonite to make a level platform for a desk chair.
Now that rocks!
Now that rocks!
Hot water plumbing
 Just a note that (except for the bathtub, obviously) I did the hot water plumbing, after a quick glue-and-bread run to Meijer. The cap is where the pipe to the bathtub will go; I did everything from there back to the elbow and sleeve just now.
Tomorrow I'll put in my new kitchen faucet and maybe call the gas company to get some actual hot water. Although, sans shower, the point is less urgent. I could clean better, though.
I suppose I could go ahead and hook up my washing machine, too.
The destructive power of plumbing
 My dad came over to help today. I showed him how the shower valve didn't work, and by the time we finished, this is what the bathroom looked like. I gotta stop having him over to help. Har, har.
But seriously, this was the logical conclusion, and looking at the plaster and rotten timber back there, I would have had to take it out just to eliminate pathogens. A little carpentry will do me good, anyway.
 The bathtub faucet is nice, solid 1920's brass, and with some shining up it will be lovely. We destroyed one screw getting the hot-water tap off, but the reason we had to take out the wall is that (1) it was impossible to get the shower bypass valve out while the faucet was still installed and (2) right behind and to the left of the hot-water tap, somebody thought it would be a great place to put a standpipe for the bathtub drain. It was literally impossible to take the faucet out backwards, so it had to come out forwards.
The hot-water and cold-water valve bodies have been replaced (they're visibly newer); whoever did that obviously had given up on the shower bypass valve. Well, we showed that guy! Of course, he probably balked at taking out the entire wall just to fix the shower, but I really need my morning showers. And that wall and the tub surround are no loss.
So that was my plumbing diversion for the day. I thought I'd cap that off so I could get water back to the kitchen sink, but my CPVC glue dried in the can because I forgot to close the cap last time. Blocked at every turn. So maybe I'll just go destroy another window or something.
In re windows: I believe I had mentioned that my two front windows are 30"x54" with a six-inch boxed frame thing between them. The 32" replacement windows are standard at Lowe's for $138; it turns out a special-order 30" replacement window would be $195. I don't know, a hundred bucks' difference for the two windows is reason enough for me to figure out a two-inch-wide center post solution. Don't you think so?
Monday, June 15, 2009
Window 1 installed
 Well, I don't know how competently it's installed, but the window is installed. (Scattered thunderstorms coming, so I didn't want the window, propped in the frame, to blow in and shatter.)
I'm not entirely convinced I was doing the right thing with the shims, but the window is square, it's against the blind stop, it still opens, and it feels quite solid, so it can't be all that bad. Tomorrow I'm going to finish the hot water plumbing, and look at the front windows now that I am an experienced window installer.
In the meantime, I'm going to take advantage of the fact that I'm caught up with the paying work for the first time since April, and I am going to the movies, see if I don't!
Sunday, June 14, 2009
Boom lifts everywhere
Now that I'm looking for them, I see boom lifts and scissor lifts everywhere while walking the dog. This is starting to seem a tad obsessive.
Caulking II: masking tape for the win!
 Oh yeah, masking tape makes things way easier. Ignoring the pleasant light rain, I caulked the left side of the window in about ten minutes, a couple of feet at a time. Since I could get sloppy on the edge, tooling the bead was easy.
 When I finished, I carefully stripped away the tape, and there you go -- a pretty decent bead!
So now you know. And so do I.
By the way: remove the masking tape before the caulk sets, even though that seems a little counterintuitive. If you don't, your weird sloppy bead will be there forever (or you'll have to cut it off with a utility knife). The point being, it won't be what you want.
Caulking

Now that the window frame is open and easy to get to from inside, I thought it would be appropriate to fix it up a little, which brings us to caulking.
Did I hear somebody ask why caulk?

Here's a shot of the daylight between that very frame and the wall it's installed in. I removed the trim on the left side of the window just so I could see the structure here; there's nothing to insulate, but that crack is ... well, today it's 80° and sunny, and I can remove an entire window and think nothing of it. But come January, when it's -10°F and the wind is whistling through that crack, well, the term "unheatable" comes to mind. The carriage house is actually pretty heatable -- except for its, you know, lack of windows, but this is just a warmup for the big house.

So I bought "Ultimate Hybrid Sealant and Adhesive", a vinyl-based caulk. Says it's UV-resistant and can adhere even to wet surfaces, and it has a convenient cap on the tip, so I figured, let's give it a shot. I've done a lot of caulking, but it actually appears as though I've never done it right. I say this because in the instructions for installing this window, I saw the term "tool the caulk". Those of you who have actual non-hilljack building experience will laugh at this point, but ... I just never considered that it might be necessary to work the caulk after squirting it out of the tube. It's logical, now that I've thought about it; caulk is thick stuff (this vinyl caulk is exactly like lanolin; those of you who have had babies will know what I mean) and it doesn't really go into the crack very well unless you push it in by force.

So, lacking a better alternative, I did a test run, and used my finger to tool the caulk. It wasn't easy, and it looks pretty amateur. I mean, it's functional, and it'll keep the air out, and from the ground it looks fine, and especially once I paint the wooden frame it'll be nearly unnoticeable to anybody but me, but I know it could be prettier.
So ... back to Google. And here I found some chatter with people who have some experience. Turns out they use their fingers, too. I'm reassured. But ... they also use masking tape to get an edge! Another suggestion is to use a plastic spoon dipped in mineral spirits, for vinyl caulk, because it's quite sticky (which I noticed) and thus hard to tool without smearing it all over.
I don't have mineral spirits (I know I bought some, but I must have left it in the Lowe's cart or something, because it sure didn't make it inside), but I do have masking tape.
 So for today's caulking, I'm ready. Here's the tape in place. Now I'm going to do some paying work, then do some more caulking. Finally, I'll end the day with more plumbing (the hot water here in the carriage house still hasn't been replaced) and maybe I'll mop some more ceilings. I'm almost done with the kitchen. It'll still need paint, but at least I'll know there's no grime under the paint. Not under my coat, anyway.
Update: Hmm. I hear thunder, so perhaps there will be no caulking today after all.
Saturday, June 13, 2009
How to remove a storm window
 OK, so remember how I said the storm window had to be removed from the outside? It's easy.
Step 1: put ladder on side of carriage house.
Step 2: climb up ladder until head is about a foot below the bottom of the window.
Step 3: freeze in sheer terror.
Step 3a: imagine the Latino neighbors looking at the stupid gringo on the ladder and laughing.
Step 3b: it doesn't help.
Step 3c: imagine the redneck neighbors looking at the stupid dandy on the ladder.
Step 3d: shut up, it's still not helping.

Step 4: after ten minutes, admit defeat. Go back inside the carriage house and figure out how to remove the storm window from the inside, standing on the floor as God intended.
See how it's held on with these strips? Remove those, and ease the window in through the frame.

Step 6: scrape old paint until it gets boring, then sit down to blog the experience, with a frosty, refreshing Coca-Cola from your own refrigerator.
I can only imagine that not getting scared on the ladder is a matter of practice. I used to be very wary on stepladders, but got used to that. It's not the height -- I can lean out the same window over the same precipice and laugh. It's the vivid mental image of how much it would hurt if the ladder, an implement which I fundamentally do not trust, would fall down.
Perhaps scaffolding is the answer. If it looked more stable, that would be good enough. But I have to figure out something; these eaves really need paint. I guess I could buy a lift truck or a cherry picker. I always wanted a cherry picker anyway. Those look fun. Too bad they cost way more than my house(s).
Hmm. Or not: Ebay lists a 300 lb rated lift platform with extending stabilizers for only $2300 buy-now price. That's pretty darned tempting. This house is really high.
Thursday, June 11, 2009
How to remove a double-hung window
 I took the plunge, and bought my first window "pocket replacement" as part of my daily Lowe's spend. But before you put a window in, first you gotta take one out. Total time: about 20 minutes. So easy, a child could do it! It was made somewhat less stressful by my selection of a window that has no glass remaining in it, but it would have gone just as easily with a more breakable window.
Here is our first victim in its native environment. Crikey, he's a big one, and he's not happy to see me!
 Here's the structure of this window. On the far inside, there is a strip of wood about a quarter inch thick and maybe two wide. It holds the lower sash in place. (A "sash" is the part of the window that moves. There are two of them, even if one can't move.) So first, we free the lower sash by removing those strips. There is one on each side, and one on top; the ones on the sides come out first.
 These are our tools. The pry bar thing is a molding remover. The hammer is a hammer.
 After the side strip is removed, see how the sash is just hanging there? Now do the same on the other side. Be careful to hold the sash in place as you finish the other side, then carefully lift the sash out. Assuming your sash still has glass in it, anyway. Mine didn't.
 Here's the molding remover in action on the top strip. None of this required any exertion at all, by the way. It all comes out easily, even after ninety years and God knows how many coats of paint.
 The top sash is held in place, and separated from the bottom sash, by a square strip maybe half an inch on a side. So next we remove that.
 Except -- oops -- the sash actually holds it in place. Since nothing yet had required any exertion or destructive force at all, I considered the situation carefully. Clearly things weren't meant to be done in this order...
 And sure enough, the square strip on the right side comes out easily.
 After it's removed, this pin still holds the top sash in place. This is what the pin looks like after I pulled it out with a pair of pliers (not shown) -- it's spring loaded and moves easily, after ninety years. Unless these windows were replaced sometime after the construction of the carriage house in 1920, that is. But they look original.
When the top sash is removed, there's one more strip of wood. Don't take that out. It's the blind stop, and it holds the replacement window it. You can't take it out anyway, because it's not just a strip on the frame, it's integral to the frame. Yes, I found this out the hard way, but the bit I split off was easy to nail back in place, and after I discovered its integrality, I checked the instructions for installing the new window. When all else fails, read the instructions. At any rate, the blind stop is important, so leave it.
 And so we're done, and it was all so easy the aloe vera didn't need to be moved. My only disappointment is that the storm window can't be removed from inside; I'll have to get on the ladder to get it off. But that's all right, because it all needs paint out there anyway.
 The newly freed window frame, now sans aloe vera to facilitate insertion of the new window.
 And here's the window's future, still in shrink wrap. That will be a topic for another day, probably tomorrow after delivery of the fridge.
I really should have been doing plumbing today, but the prospect of using my new molding remover to take out the window sounded like too much fun.
Wednesday, June 10, 2009
Windows!
 The carriage house has a total of six windows, all 54" high. They are in varying states of repair, but basically, except for one, they're total losses. Here, you see one of the front windows, which has been boarded up, in its naked state. There's no window there.
And sure, they could be fixed. But look at them -- they're nothing special. The big windows in the big house, I'm not replacing those; they're fabulous. But these? There's just no reason to work hard to keep them.
And fortunately, Pella makes vinyl inserts for existing wooden frame double-hung windows. You remove the sash (or, as with this window, you buy it preremoved), and stick the new window into the hole, shim it, screw it down, and caulk it. It takes about an hour, according to the brochure.
So. The bedroom window is 36"x54". Standard, $166. These two are 30"x54", which is not standard, but as you can see, there's just window frame between the two of them. There is a 32"x54" standard window. I'm just going to put a board between two of those for the front window here, after removing the intermediate framing post there. I forget the exact price of the 32"x54" insert. The other three (hallway, kitchen, and bathroom) are all 28.5"x54", which neatly fits the standard 28"x54" given a little quarter-inch board on each side. I believe those cost $116 per. So we're talking about maybe $800 and two days' work to replace all the windows here in the carriage house.
That is hereby the plan.
Tuesday, June 9, 2009

Carriage house water heater - change in plans
I talked to the plumber about installing the tankless water heater. Turns out (logically) that a tankless water heater needs a more robust flue than a regular water heater, because when it's in use it really cranks through the heat. So I realized that I don't really want to get into a long, drawn-out project with updating the flue, just to get moved into the carriage house.


Long story short: I bought a replacement water heater, a regular tank heater, and my dad and I installed it this morning. Here it is, all shiny and fresh. Note that it has a separate cutoff - which is useful, because of course I haven't replumbed the hot water yet.
I tested the hot water, and yeah, got kind of soaked. There's at least a fitting blown under the bathtub; the rest look like they might be OK, but it's hard to tell when all that water is spraying around.
But - as soon as I have that fixed, and call the gas company to get my gas turned on, I've got hot water!
In other news, I've made a lot of progress in mopping ceilings and walls. It's looking a lot better in here. Still smells like bleach, but that's a real improvement on what it smelled like two weeks ago. Ha.
And in other other news, I measured the bedroom window, just to get an idea of what it might cost to replace windows. It measures 36" x 54" - meaning it's a lot bigger window than it really looks in place - and wonder of wonders, that seems to be a quasi-standard size. I have a wooden option at Menard's for $250, and Lowe's has a vinyl insert for $150 or so. In total, there are six windows in the carriage house, and frankly, they're nothing special, so I don't feel bad about replacing them with something more modern. So I could do it with halfway decent wooden windows for $1500, or cheaper-looking vinyl for $900.
Sunday, June 7, 2009
Dirty carriage house ceilings
 Just as a point of reference, here's the dirt on the ceiling of the carriage house. The thumbnail here doesn't really show much, so click through for a higher-resolution version. When I first saw this, I thought it was mold. Imagine my relief to find it was a mixture of food and cigarette smoke. The paint is a super-durable double coat of enamel, so the dirt comes off easily with a bleachy mop and a little scrubbing, but I find it surprisingly tiring to hold the mop up for that long.
Anyway, nearly caught up with Job #1, after which I will be catching up with Job #2, after which, the theory is, I will be back to more frequent House work. I was cleaning here in the carriage house until I ran out of bleach. But yesterday, I bought more bleach, so ... progress. Yes.
Subscribe to:
Posts (Atom)