Friday, November 26, 2010

Interior insulated shutters

From SFgate (the paper in San Francisco), of all places, we have an interesting 2008 article about interior insulated shutters. See, windows that are 4'x8' and consist of a single pane of glass have an R value of roughly negative a million, meaning that they actively suck heat energy into the icy blackness of space.

Seriously - if they're puttied and caulked, they're not really that bad. But insulated shutters keep light in at night, too, and the benefit is that they don't affect the outside appearance of the windows, which is really an important issue if you have traditional windows. For me, anyway.

There's a whole long list of energy conservation measures here, including many ways to improve the insulation values of windows. Most of them are lower in priority for me than sealing up the myriad holes in the basement (including several windows that are inexpertly boarded up), but the shutter thing is really intriguing. I have two big pieces of Styrofoam left over from the carriage house family room floor that are serving as insulation right now in my office, but it's not a particularly permanent solution.

What I want to do in the parlor

Built-in bookcases, how-to courtesy of the ever-bountiful Popular Mechanics. Wouldn't something like this look really good? The only problem there is the 12-foot ceilings. If I take the shelving all the way up, I can't get to most of it, but if I don't, what do I do at the top?

There's also an excellent how-to for a standalone bookcase. Also, not a propos of bookcases but still useful, pro tips on crown molding. Thus concludes my Popular Mechanics link dump.

Wednesday, November 24, 2010

Back carriage house door

So towards the end of the summer (August 25), we did some yard work, and one of the things my wife volunteered for, as the only not-yet-sensitive individual in the family, was to carefully extricate some of the old poison ivy from the back door in the carriage house. The ivy itself was dead (I killed it quick upon arrival in 2009) but the dead vines still contain urushiol, and I typically break out just from leaf debris falling on my head.

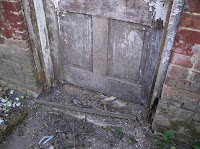
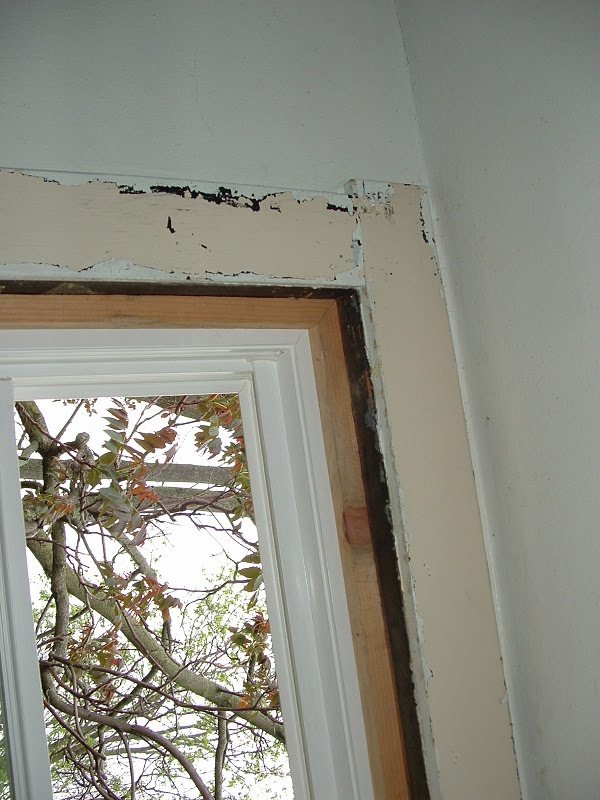
Well, when the door was freed of its vines and associated leaf mold, we discovered a sad fact: the threshold and lower frame of the door had at some point been eaten by termites. The threshold was entirely gone, leaving a surprising amount of space open under the door once I removed the humus.

This was bad. This is a flashing neon sign saying, "Mice welcome here." Not to mention drafts.

Since we don't really 
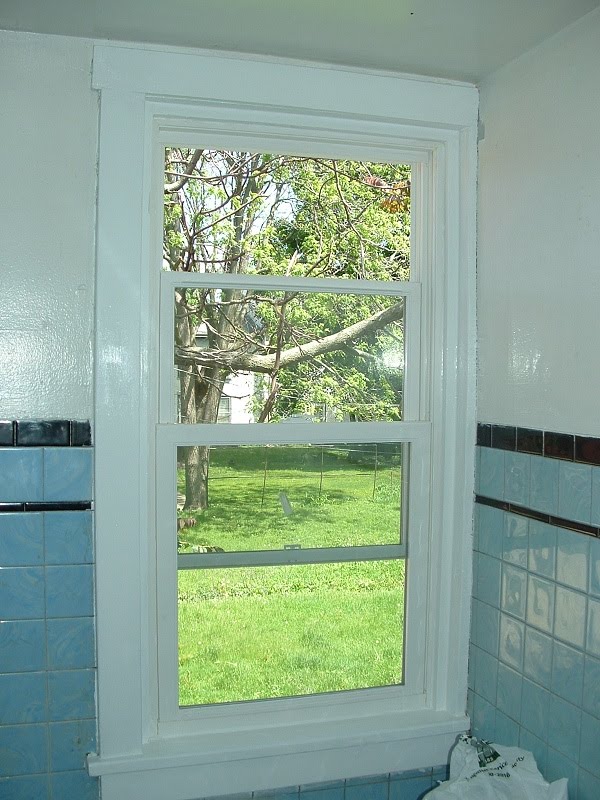
need three doors on the east wall of the carriage house, I figured I'd frame it in and replace it with a window, like the window on the south end of the west wall. That window is pretty cool. So I went and bought a window of massive dimensions (34"x56", only something like $190 at Menard's) and ... there it sat for a while. There was so much other winterization to do, and glazing a window for my daughter's room, and a drain broke in the big house and had to be replaced, and, well, it was November before I knew it.

On November 13, I had had enough, and poured the footer for the new bit of frame wall. It took me maybe an hour. Part of the reason I took so long to get started, to be honest, is that the bottom of this footer area wasn't level, and there was a big gap at the left end of the plywood form. Pretty stupid reason. I ended up taking a bit of brick and two small marble rocks from the garden and placing them there, and just pouring the concrete over them. It worked great and looks great, so ... there's a trick you can use if you're ever in a similar situation.

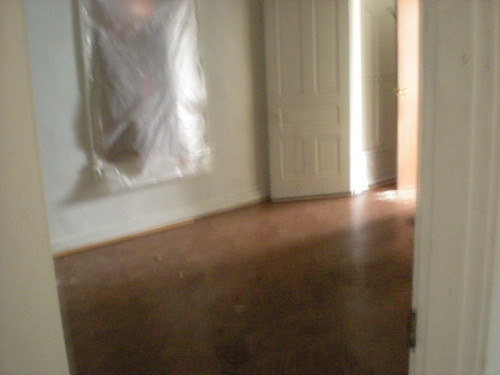
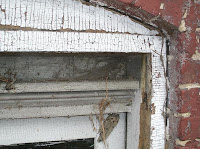
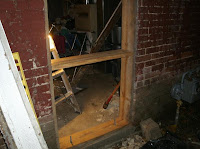
Well, but I'd opened that door, and as you can see, the frame was no longer really attached to the building. I couldn't close the door again. I did the best I could and stacked some junk against the inside, and let the concrete cure for, um, well, the camera must be lying when it says I left it like that for six days. Right?

On November 19th, the paying work subsided to the point where I couldn't ignore this any further, and so I started removal of the door and frame. I wanted to keep the round wood at the top, and the top of the frame was also still solid, so I basically wanted to cut 2x8s out of the floor framing in the big house basement (long story - but the short version is, the previous owner had some odd ideas about the parts of houses that could be rendered habitable, so I have a great deal of framing lumber for these projects) and fashion a new frame in the shape of a U.

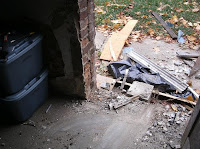
The process of cleaning the old door out yielded a great deal of rubble, and was done by about 1 in the afternoon (I had only started around noon), at which point I realized I had no drill bit for my bottom frame part, which I wanted to bolt into those anchor bolts you see here. (Doesn't that footer look pretty good? I'm feeling like maybe I know what I'm doing, a little, with concrete.)

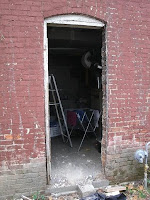
So I left the house with a big hole in it, to the amusement of the neighbors, and went to Menard's for a drill bit and Taco Bell for lunch (and kind of regretted the latter, although the Wodehouse accompaniment was top-notch, don't you know, old top). Then came the taxi work for the afternoon, and so it was four o'clock by the time I got back to work. Did you know the sun is setting at about five these days? This was frustrating.

But by 7:30, the frame didn't look half bad! It took this long because no matter how carefully you measure a distance in a 130-year-old brick house, the wood you cut will still be wrong. Note the presence of the maul. This frame will be there for another fifty or a hundred years, easy - the middle crossbar there was about 3/16" too big. Rather than cut it again, I pounded the darn thing into place, with the added benefit that the sides of the frame will not drift on the wall. (The original builders didn't nail the sides to the wall, so I didn't either.)

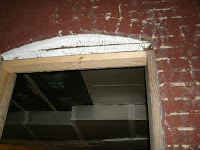
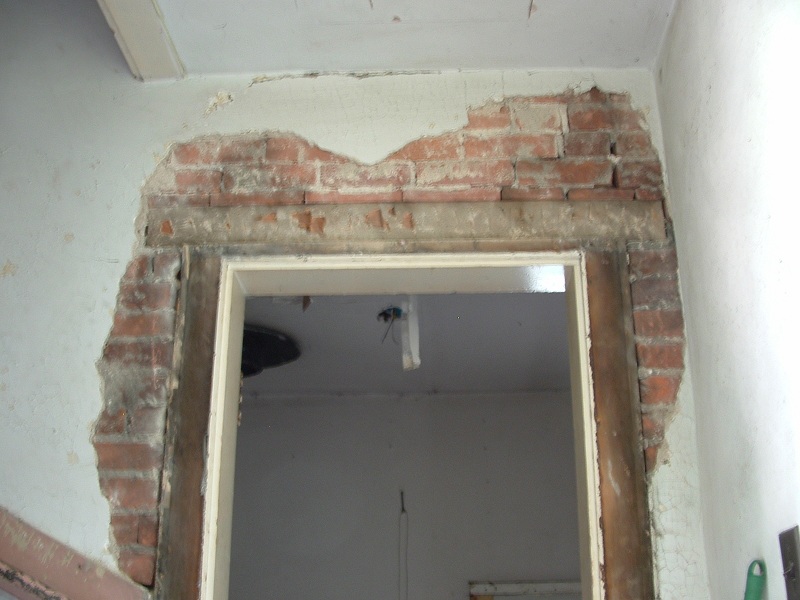
I put a 2x4 at the top of the window to give me something to nail the window to - and then I realized that it was pretty handy for holding the round top of the old door up to the top of the opening. 8 PM at this point, and I had paying work to do - but I still had a gaping hole in the side of the carriage house, and the nights are getting pretty chilly.

I popped the window in, which took about ten minutes at this point (for once, something fit as measured) - here it is on the inside, showing how much plaster work is going to be necessary.

Then I cut a piece of plywood to cover up the open part on the bottom, and worked on paying work into the wee hours, and slept the sleep of the just.

On the outside on the 21st, I framed around the window with 1x2s and painted the whole thing with my oil-based white primer. And that's as far as I've gotten - I want to put an exterior outlet there (it will be the first on the whole property) before framing in and plastering over the whole thing.

But here's a picture of the outside, which save a little more caulk and the topcoat (which at this week's temperatures is looking like it will have to wait for spring) is essentially done. I get a little frisson of pride every time I see it, which is several times a day. (It does make the kitchen window above it look even more ragged in contrast, though.)

Monday, November 22, 2010

Stuff

Ah, Gentle Reader, I'm not neglecting you or The House, it's just that I've been embroiled in longer-term projects (well, the way I do them they're longer-term) and so you'll be getting longer posts about the replacement of the back carriage house door with a window and some glazing I did in the big house.

I got two more first-floor windows primed during this Indian Summer heat wave, so that was good!

I'll leave you with a picture of one of my favoritest things I've ever owned.

Wednesday, October 27, 2010

Ventless gas heat


There are now gas-burning heaters with efficiency sufficient to eliminate the need for vents and flues: they burn the gas completely.

So I had an epiphany: our fireplaces here were actually made to burn gas; their chimneys have been mostly blocked off, though. The obvious fix: ventless gas heat.

I'll want to install all new gas lines to them if I do that - I really don't trust the old stuff, which is half-rusted, half-incompetent, all-scary. Apparently working with steel pipe is considered extreme how-to. But you know? I've learned masonry and glazing - I can learn to cut steel pipe (not to mention my dad did his original apprenticeship working with steel pipe - so I have an expert teacher, for once, instead of just relying on Mr. Google and his billion friends).

Saturday, October 2, 2010

Neighborhood cleanup

One of the corollaries of buying a house for $8000 is that your neighbors are frequently not of the most desirable nature. They have a tendency to be loud at night and quickly turn the dome light off in the car when they see the police arrive after being called at 2 AM because they were seeing a whole lot of people, one after the other, each having about one to two minutes of business to transact.

[Note: (1) the view here is to the south from the upstairs sunroom, where I had a commanding view of the entire affair, and (2) this new camera is really fantastic - nighttime shot, no flash, through a window, and it's not Time/Life quality, but definitely passable as documentation.]

Anyway, what blew my mind wasn't that I got to see my first drug bust. What blew my mind was that the police had to call the mother of the children in the back seat so she could take them home. I'd estimate their ages at 10, 5, and asleep under a blanket. But at least they had the booster seat for the 5-year-old! I mean, they weren't irresponsible.

Three guys were handcuffed and taken away, and there was at least one large plastic bag of some sort of substance on the top of the car at one point in the proceedings. I couldn't see a color, but from its apparent density (low) I'm guessing it was marijuana, not coke.

So that's one lot that won't be waking me up any more. Honestly - I don't care if people engage in a little free-market trade, just as long as they do it quietly when they're outside my window.

Update 10/5 from the police blotter of the local paper: "[cool name], 24, [some other town]: Possession of marijuana or hashish (Class D felony), Saturday, [the street outside my south windows]"

Thursday, September 30, 2010

And you thought I wouldn't post in September

Sorry. The paying work has been insane this month - really, the first busy month I've had all year.

I wanted originally to say that there wasn't much to say about September, because I haven't done much on the house. But then, thinking back, I realize I've done a lot in bits and pieces. So here's a roundup:
  • Lots and lots of tuck pointing, including that one bit on the west wall of the carriage house where three bricks had fallen out entirely. They're back in, now. The carriage house is now tight enough that the mouse problem is gone. While cleaning the mortar out on the southwest corner on a windy day, I was surprised to find mortar dust blowing out of the wall - it was blowing in on the other side of the corner... That tells you you really need to get to your tuck pointing.
  • We cleaned up around the northmost door on the east side of the carriage house. I'd been putting it off because there was lots of poison ivy and I don't have a full-isolation environmental suit. Anyway, so we did that, only to discover that the bottom two feet of the door frame on both sides and the sill plate had an argument with some termites sometime in the past. And lost. So that entire frame has to come out. The plan is to put a new vinyl window there and frame in under it, like the west window on the carriage house.
  • The cast iron drainpipe from my one working half-bath in the big house is cracked. A lot. This is on the same drain system as the flange that rotted the parlor floor, so I started by cutting that pipe out. I'm still in the midst of my second cut; those big cast iron pipes take a lot of hacksawing. Anyway, so I'll be taking plastic nearly up to the wall and discarding a lot of drain that is solely of historical interest.
  • The little boarded-up window on the southwest of the carriage house (inside; outside [it's to the left of the red wall that used to be the garage door]) has gotten some attention at last. Its sill was egregiously rotted (and they'd nailed some aluminum siding over that to make it look less so), and the bricks had pulled about a half inch away from the frame. I've got the old paint off and filled the worst of the sill rot with mortar. I'm using Bondo for the rest. More on that effort later. I also filled mortar in to the half-inch crack on the side; we were losing a lot of heat there last winter. (It's already plastered on the inside, but still.)
  • Good Lord, I never even posted in August about the plaster fixup and paint job in the carriage house living room. It looks pretty good, although I'm obviously still learning how to use Plaster of Paris. Still - better than it was, and that's the primary goal.
  • We've been getting primer onto trim - the downstairs windows of the big house, and the doors of the carriage house, so far. It's slow going, but really makes the whole house look so much better.
So I'm way behind on writing. Hopefully October will be better.

Thursday, August 26, 2010

Long live the camera

Meijer had a great clearance on $40 GE cameras. I love the technology curve - I spent $100 on my last clearance camera and it was nowhere near as good as this one.

Anyway, the plaster patches on the back stairs are dry now - well, they were effectively dry even as I was putting them on the wall - and you can see how rough they are. A lot better than the holes they replaced, granted, but a disappointment.

The new camera can only hold ten pictures at a time (I haven't bought memory yet) so I needed to get this out of it to take pictures of today's plaster triumph. I started patching the front room in the carriage house. Here's what it looked like after removal of the previous owner's drywall mud. Click for the bigger picture, of course.

The upshot is: you can't really effectively patch cracks in plaster and brick with tape and drywall mud, so the patches are cracking, roughly three years after they were applied. I'm stripping off the worst of them and patching properly with plaster.

To mix the plaster, I started with a clean container: a Teflon-coated breadpan that had already been repurposed for geode cleaning. No stick = no crystal formation. I also added a splash of vinegar to the mix. The upshot was that it took a good half-hour for the plaster to start hardening in the pan, which was enough time to actually, you know, use it. I also cleaned my painter's knife and plaster trowel thoroughly before starting (and again after finishing).

And it worked! I've been scared of plaster's reputation as being a lost art mastered only in historical times by towering giants of the construction industry. It may very well take years to get good at it - but it took me two tries to get acceptably OK. I think some more tries will make me confident.

Pictures later. I'm going to go take them now.

Monday, August 23, 2010

How not to apply top coat plaster

Well, the camera is officially dead, so no pictures until I get a new one, but I took my first stab at applying top coat plaster to some of the patchy areas on the back stairs, and I have some recommendations about how not to proceed.

First: I'm using plaster of Paris. Here's the thing - if there's prehardened plaster (i.e. something with crystals already in it) in your bucket? The crystals will catalyze the new plaster into hardening really, really fast. So I mixed up just a little - and it was too hard to apply within five minutes, I kid you not. And that doesn't leave much time for smoothing. Of course, on that wall, any amount of smoothing is an improvement, and nobody says I can't take several stabs at these patchy bits, either.

After seeing how well that didn't work (well, it was exciting to try my new big steel trowel, and it was my first top coat attempt, and that was fun) I went back to the Google drawing board. The chaps over at diyplastering.co.uk have some nice information about plastering, and bucked up my courage in thinking maybe this is something I can manage. And the guy at brooklynrowhouse.com swears by his Magic Trowel, so maybe I'll try that - but he also adds a little vinegar to his plaster of Paris to keep it softer longer. That's a good idea.

But one thing everybody says - keep your bucket and tools as clean as humanly possible. I didn't. For mortar or basecoat it just doesn't matter - but plaster of Paris cares.

More later, after I have time to experiment some more. I'm going to need the practice, because after I started peeling the paint off the walls in the upstairs sunroom, huge patches of the top coat came off, too. So I have most of a wall to do in there. And of course there's lots of top coat repair in the dining room, too, and I'll be seeing any flaws there for years.

Thursday, August 12, 2010

I'm back!

Well, I kind of expected to blog a little about the architecture in Budapest, of which I have copious photographic evidence, as you can well imagine. But (1) I ended up being pretty busy with work this summer and thus never got around to writing much on architecture, and (2) I've been writing more about software instead.

But, exhausted, we rolled in today after a marathon drive back from JFK (itself following 8 hours in the plane from Geneva after a three-hour drive from Zurich, where the train delivered us in only 12 overheated, poorly air-conditioned hours between 7 in the evening Monday and 7 in the morning Tuesday). Rewind the chronology on that, and you'll see it was planes, trains, and automobiles for three days, one of which was a 30-hour day.

Anyway, we got in, stripped two months' worth of spiderwebs off the front door (seriously), managed to remember the alarm code (whew), and walked into the carriage house. Except for mold in the fridge, there was no damage from two months' disuse, and the air smelled clean. This is literally a first for us; we've had horrible things happen during these summer absences; once the entire house sprouted mold - different colors of mold, including in the carpet of the car in the garage. We sold that house at a ridiculous profit in 2004, and laughed all the way to the bank. I miss the tree house there, though.

All summer long we've been thinking seriously of selling the place and getting something in a little less grungy part of town. It would kill me, but the family would like it. But you know? A house that doesn't get moldy when you leave it alone for a couple of months is kind of a keeper.

The big house smells a lot better now, too, now that the gutters are fully functional. The basement is still damp; the dehumidifier will only run for a few weeks before its bucket fills, no matter how tightly I tighten the hose. Not to mention a lot of the basement floor still has its plastic vapor barrier on it, which I really should remove soon.

Anyway - we're back. I was surprised how glad I was to see this place.

Monday, July 19, 2010

Narrow escape!

Somebody was talking about making an interesting offer on The House, but I haven't heard anything for a few days. Whew! Bullet dodged!

Wednesday, June 16, 2010

Venice

Is it wrong to go to Venice and take pictures of the infrastructure? (Just kidding; I have lots of normal pictures, too.)


Monday, June 7, 2010

Housebuilding hiatus

"Oh, sure," you say, "You already went into hibernation once this year!" Well, Gentle Reader, this won't be hibernation; it'll be estivation. We're off to Budapest tomorrow for two months, and so there won't be any House work completed during that time.

Not to say I won't find something else interesting to post here (Europe does, after all, have the occasional attractive old building), but it won't be about progress on The House.

So I guess this would be a good time for a planning post, wouldn't it? Here's something like the current list:

  1. Windows in big house

    • Finish painting first-floor windows
    • Glazing work; several missing and cracked panes here and there, lots of putty replacement

  2. Winterization

    • Carriage house
      • Weatherstripping around two downstairs doors
      • Insulated board for small window on south corner
      • Still a little caulking/plastering above the south wall and in the closet area on the southeast corner
      • Insulated board for attic access panel

    • Big house
      • Urethane in obvious holes in basement walls (mortar later)
      • Boards over vents under first back addition
      • Board up two basement windows on east basement

    • Tuck pointing on both buildings

  3. Carriage house bathroom
    • Attach and plumb vanity

  4. Carriage house electrical work
    • Replace stolen ground wire outside
    • Overhead light for washer/dryer area
    • Separate circuit for bedroom to permit use of air conditioner

  5. Carriage house paint and trim
    • Paint walls and trim in bathroom
    • Finish trim on remaining windows (three)
    • Fresh plaster patching and paint in living room, then hallway, stairs, and kitchen

  6. Equipment closet in big house
    • Reroute incoming DSL into closet in dining room
    • Add an electrical outlet there for the Linux box

  7. Carriage house garage area
    • Remove superfluous fiberglass insulation (40% complete)
    • Still some miscellaneous plaster, and more paint, aye!

  8. Dining room
    • Remove and scrape wallpaper (60% done, thanks to daughter)
    • Remove damaged drywall from ceiling
    • Finish restoration of plaster on walls (base coat's on)
    • Drywall ceiling
    • Paint (I'm still liking that semi-gloss ultra white)
    • Clean and maintain the woodwork and buffet
    • Shore up under floor (soft spot from long-standing leak in roof fixed in 90's)
    • Polish floor

  9. Carriage house kitchen window

  10. Carriage house roof and gutters (the last big money job to save for)

  11. Porch restoration

    • Paint all pillars
    • Cast duplicates of scroll work on pillars to replace missing bits

  12. Big house heat (not so crucial now)

    • Ductwork as needed
    • Probably baseboard heat upstairs, at least in my office

  13. Remainder of big house

    • Upstairs bathroom plumbing (got a good plan to reroute this)
    • Addition of sink in kitchen
    • Cleaning
    • Finish plaster patching in back stairs area, paint
    • Reroute supply wire to blue room electrical (that's the one running outside right now)
    • Think about plaster on basement walls, a big job
    • It would be nice to insulate and finish the attic space
    • Tiles in the master bath?
    • Hardwood veneer in the Blue Room?

  14. Breezeway/swimming pool connecting buildings

    • Well, I can dream

Friday, May 28, 2010

Plaster!

So now that I'm in the big house, I walk back and forth a lot between the front of the big house, down the back stairs and out the back door, into the carriage house and up those stairs to the apartment, which is still where the bathroom, kitchen, and remainder of the family is located. Not to mention, downstairs in the carriage house, the family room and my shop (actually just tool and materials storage, as I don't have a proper workbench).

I go through this door a lot, which is between the mudroom and the back stairs. It was originally the back door to the one-story back addition, probably originally the kitchen, and the "mudroom" is basically just a later back porch that has been enclosed - one wall still has the siding of the earlier back room, and the other wall is the brick of the earlier earlier back room. (This house tended to accrete back into further and further back rooms.)

Now, the problem with this door is that the frame had somehow managed to move to the east (that is, into the house) by about 3/4". The problem had obviously been of very long standing, because it had been caulked and some plaster added, clearly in an attempt at winterization. So naturally I popped the trim off, nailed a couple of 2x4 bits to it, and took the maul to it - which worked wonderfully! In about five minutes, I had it back where it was supposed to be!

Unfortunately, all the plaster around the door frame kind of fell off; the old box gutters were attached to the eyebrow that had a squirrel living in it last year (scroll down), and so there was obviously a great deal of leakage through the wall.

So I took the opportunity to go to Menard's and make an exciting new purchase: a bag of base coat plaster!

Anybody who's been reading this blog for any length of time (a year already!) knows that I favor solid construction and masonry. The only problem is that I've never done any of it, so I'm learning as I go. This was therefore a gulpingly novel step. My first real plaster job.

Incidentally, the old basecoat plaster on this wall probably dates to about 1890 (the date I believe this back room was added, along with the dining room bay), and yes, it is mixed with what appears to be human hair for strength. Which I'd read about, and is only marginally creepy.

Lesson #1 about plaster: you need a lot of it. A base coat about half an inch thick over a couple of square feet of wall is a lot more plaster than my usual half-hour tuck pointing quantity of mortar. So this first bag of base coat is going to go fast.

But the first part of the base coat turned out extremely satisfactory in terms of solidity. Here's a picture. I'll update you when I try the top coat - right now I'm knocking out all the crappy bits of plaster on the back stairs and putting a base coat into those (rather extensive) gaps.

Tuesday, May 18, 2010

I'm in the big house

A hueueuege milestone, one year and two days after my arrival - I moved my office into the upstairs front room of the big house.

In case you're wondering, that dot on the wall between these two windows appears to be the fitting for the original gas light. I mean, I can't be sure, of course; I can't find the pipe where it starts, but that's my assumption. If true, it's the only such fitting I've found in the house.

Sunday, May 16, 2010

One room spiffy and clean

One room nearly done (the carriage house bedroom). First picture is the picture my sister took the day we closed; the second is the one I took just now after lots of paint was applied, the new window is trimmed and painted, and a new light fixture is in place. I guess you see the baseboard heater as well. (The door is still stripped here and needs a new knob, but it's always exciting to paint things and the room won't be this empty again any time soon.)

Friday, May 14, 2010

Remember that first window?

My first window removal, June 11, 2009. I finally trimmed and painted it, May 13, 2010.

Progress!

Friday, May 7, 2010

The bathroom window! Trim! Paint!

According to my notes and project documentation (digital cameras timestamp your pictures - who knew?), it was August 31 when I started the replacement of the bathroom window. The sill was a sodden mess of humus, obviously not having been maintained for decades - and north-facing, so never getting properly dry. Here you see the initial state immediately after removal of the remainder of the existing sashes (they had no glass in them when I bought the place - just some exterior Visqueen, sigh). I doused the whole thing in bleach and dried it with the heat gun; it smelled like wet dog.

I scraped off everything spongy, leaving a 1.5-inch-deep cavity under the inside sill which I filled with urethane foam. I painted the outside sill with a Zinsser fixative-slash-primer - I plain love everything Zinsser makes, really a better life through chemistry kind of company!

The result was something pretty sturdy for the next few years; the wood that remained was still pretty solid. Here you see that intermediate stage after about three coats of that primer. It's thin stuff that soaks into the substrate and makes a solid surface. I love it.


That's the view from the outside before any paint was applied (I don't think you've seen the north face of the carriage house yet, and that's the top of the outhouse, which is built exactly like a brick outhouse). Once this much was done, I filled in the cavities with caulk and painted the heck out of it; two coats of my oil-based exterior trim paint. The result looked like it hadn't been neglected since the Nixon Administration, so I figured it was time to pop in the window.

Then I went into hibernation.

Well, fast-forward to now. Unfortunately, I got a little out of the habit of photographing everything, and it appears I didn't take a picture of the untrimmed interior - suffice it to say it had yellow foam sticking out, and you can see what the interior trim looked like. My wife put down the imperial foot, and beautification thus became the order of the day. Fortunately, the paying work had come to an abrupt halt on April 16th, for the usual lack of any discernible reason (the translation industry acts seasonal - but scaled to a year from some other planet, perhaps one in a binary system without a stable orbit). The upshot: I had both motivation and time. It was time to trim.

Trimming was complicated by the fact that the window was actually an inch too narrow for its frame (I didn't want to spring the extra $100 for a custom size for one lousy inch). So instead of a simple quarter-round trim on the edges of the pocket window replacement, I used 1x1s left over from the roof job last summer. You can see here that the trim paint had to be stripped, too - like all the trim in the carriage house apartment, it's latex applied on top of oil. Sigh. Without primer, of course, so it just peels off. Here you see it peeled off.

After much heat-gunning, the oil coat underneath was also removed (well, mostly), and the fully-trimmed window is now ready for painting. An unfortunate lens artifact makes it look like the carriage house is a lot less square than it actually is; the window does not actually bulge like this in real life.

Here you can also see the blue plastic wall tiles of the bathroom. A much later followup job will be to take those off, scrape their glue, and paint the entire wall with a resilient bathroom-appropriate paint. They're pretty horrendous.

Zinsser 1-2-3 primer sticks to anything, including the residual oil paint left on this trim, and since I'm using an interior latex, priming is important. Priming also shows us just how many nail holes have been knocked into this window over the decades; so I caulked them all up and laid down a thin bead along all the seams of the trim as well.

The next day, the topcoat - et voilà! A lovely trimmed window just like Mama used to make. Now I only have one window (the kitchen window) to replace, and a total of four to trim and paint; I've started stripping the paint on the bedroom window this week.

This window is literally so nice it gives me a thrill to look at it, even a week later.

Friday, April 16, 2010

Basement cleanup

One of the things that has been on my to-do list for about six months or so is to remove the raised floor from the basement in the big house; you may remember that we started that last fall to get 2x4s to frame in a similar floor for the downstairs family room in the carriage house.

Well, this week was a neighborhood cleanup drive - the city comes by every couple of days and hauls off whatever you put in the alley. For free! So it was judgment day for the basement floor.

I have never been so bone-tired in my life. Every one of those horrible sodden pieces of particle-board flooring (yes, in a basement) had to be lugged up the stairs and out to the alley. About 40% of them had various colors of mold on the underside, especially on the relatively wet east end of the basement. Fortunately, the moldier they were, the softer they were, so the maul made short work of ripping them off the frame.

I donated the 2x4s back to the guy that originally installed them; he's still running two houses across the street. He was happy to have them back, too; they're building a deck between the houses, apparently. I tossed the 2x4s out one of the basement windows into the south yard, and my 11-year-old earned $10 carrying them from there onto the front porch for intermediate buffer storage.

At any rate, I took a few pictures of the (now cleaner) basement, but frankly, except to me, it still looks the same. The only real difference is that it is now drying out, because all those spongy sheets of particle board are no longer trapping moisture under them. Double-plus good!

Saturday, April 10, 2010

Spring

Turns out there are a whole lot of tulips in our yard. I got here too late last year to see them, but wow - they are nice!

Thursday, March 18, 2010

Plaster and mortar

The work in the carriage house "basement" is proceeding apace, and as promised, here are some pictures of my technique, first a before on the right side of the central east door:
Then the after, which is the other side of the door, which actually had a much larger chunk of plaster missing:

The way I've been doing this is to fill most of the void with mortar (you can see some new mortar in the hole in the top picture, but that was a little extra from my last batch), leaving just about an eighth of an inch of space. Then I put a "topcoat" on with patching plaster. On the corner I push it around to be vaguely square, then after it sets I go back with a knife and straighten it up. The result is not as strong as proper topcoat plaster, but it's easy to work with, and the mortar underneath is so strong on the bricks that it seems to work just fine. Ask me again in twenty years, I guess.

But I'm reasonably proud of the appearance. I don't really care how smooth the end result is, because the rest of the wall is so irregular that truly regular plaster would look odd. But it's a pretty strong corner and square enough. Once it's all painted I think this is a pretty good look, and it's already better mortar and plaster work than I was doing in the fall. Another couple of years of this and I'll be good at it!

Possible Caribbean venue

We may be on the trail of a fixer-upper opportunity in Puerto Rico. Definitely my kind of house! On which, more later if we do anything with it. This one's not actually finished - besides landscaping, it needs windows.

I'm good at buying houses without windows, though!

So we'll see.

Update on the dining room and upstairs plumbing

You may ask yourself why the dining room and upstairs plumbing share a post, but I'll bet you can figure it out from this picture - yes, the upstairs plumbing is all above the dining room ceiling.

It's spring! And besides resumption of the drainage work (more on which later), that means it's time to finish the plumbing in the big house. And that means pulling all the water-damaged ceiling down from the dining room to expose said plumbing.

Looking straight up from the ladder, we see the supply lines to both upstairs bathrooms. We're standing under the toilet in the blue room's bathroom (the one with the microtub). I'm sure you'll be seeing plenty more about both bathrooms in the year to come.

At any rate, I was pleased to discover that the plumbing appears to be in pretty good shape. I found a leak in the shower in the microtub (or it looks like it - it's been dry for a year, so we'll see, this week, when I hook up the water again). But there doesn't appear to be any freeze damage from the foreclosure period, so ... we'll see what we see. The plumbing in the kitchen, which is on the same branch of the supply, froze badly and I've had to knock out a lot of wall to find it all, so it was a pleasant surprise that I wouldn't have to fix any plumbing thirteen feet above my head.

I do need a taller stepladder, though. I won't be able to fix this ceiling with my little one.

The structure of the ceiling is horrible. You can't get a good impression of it from the picture above, but there has been a lot of sagging. The previous owner just nailed drywall to it all and it was utterly invisible (I guess a ten-foot-tall man would notice, but the rest of us are so far from that ceiling that three inches of sag are literally unnoticeable), but I'm going to try to do a more solid job of restoration than that.

More on that later. I just wanted to prove I'm not dead.

Wednesday, March 10, 2010

Historical film

One of the neighbors clued me in on the existence at the public library of a short documentary of the neighborhood ("perhaps one of the finest still remaining in the Midwest" and that's the closest description of our location you've seen on this blog yet) and I gave it a look.

The house looked pretty much the same in 1989 as it does today, except the odd green color of the window trim was not yet in place and the porch was in better shape. It's shocking to realize that's been twenty years ago already.

At any rate, there wasn't much new information to be had, except that the house is a "typical Italianate of the type built between the 1870's and 1880's" and that the owners at the time, probably wanting to remodel due to the new Queen Anne houses being built, added the porch in that style around the turn of the century.

In terms of house building, it's been quiet on that front, hasn't it? Basically, it's the same plan today as it is every other day, Pinky: masonry and plaster. I did manage to get the bathroom sink anchored to the wall, but the drain pipe is clogged, so it's still not functional. But on the masonry/plaster front, things are rather nice, as I've been working on the east wall of the carriage house and getting rather good at it, in my humble opinion. I'll take some pictures soon.

Sunday, January 24, 2010

Heat!

Heat's on in the big house, now that the weather is in the 50's. Ah well. It's still progress.

Wednesday, January 20, 2010

Finally back to building!

New target: the east door on the carriage house. The ultra-frigid weather of two weeks ago is gone, but there are still some serious drafts howling through our nice new family room, so this effort is important.

For orientation, note that you can see the sunroom roof through the transom of this door, and the Japanese maple that's between the buildings. In the backyard picture from July, this door is to the far left of the picture, and it is directly under window #2.

The cord hanging down is my quick-and-dirty wiring for the security light outside; part of this project will be to wire that properly and insulate the arched space above the transom.

As always, the first order of business is to fix plaster. First, I removed the inner board of the arched space (look at those arched bricks - aren't they neat?) to see what fell off. The large chunk of plaster at the right above that arch did so, and so I took my caulk/adhesive and glued it back in place. I caulked the right side of the door (light showing), then I mortared the missing plaster there, right on top of the caulk. The left side of the door is in better condition, for whatever reason.

This is getting to be my pattern for this plaster. I'm using mortar as a base layer, then patching plaster as the top layer. I'm sure the patching plaster isn't as strong as a true plaster top coat, but this is working OK for smaller areas like this. And you can't beat mortar for strength, assuming you mix it right. (Ahem.)

Anyway, that was yesterday's work. Today, I put a deadbolt on this door. The old lock was missing, so there was a 1-1/2" hole in it. This is not what we in the building trades consider winterized. So now it's better.

Friday, my HVAC friend is coming, and we'll have heat in the big house for the first time. (Ahem again.) Then we can get back to plumbing over there. So more on that in the days to come.

Sunday, January 10, 2010

The pipes froze anyway

Dammit.

The good thing is that since I had at least shut off and drained part of the plumbing, the part that froze (in the big house's kitchen) didn't harm any of the pipes. Judicious application of space heaters has thawed some of the problem - but still no water to the carriage house yet.

I clearly should have wrapped these pipes with heat tape.

Saturday, January 2, 2010

Not The House

Even crazy house people need a vacation from time to time, so we're visiting friends in Puerto Rico. This is a picture taken at the Campamento del Caribe, which is run by some of those friends, who happen to have an apartment free until the 10th. We had to drive to Atlanta to get affordable air fare, but it was so worth it.

In the meantime, back at The House, nighttime temperatures are down to 9 degrees or so. Yeah, I drained the plumbing in the big house as we were leaving - I haven't gotten that flue replaced, so no heat there yet. So far it hasn't been an issue, but as cold as it is, I think it most certainly will be now.

So - happy New Year to all! In lieu of resolutions, I just have a to-do list.

  1. Big house heat

    • Flue and chimney liner (to be done by an HVAC friend of mine)
    • Ductwork as needed (to be done by me)

  2. Winterization

    • Carriage house
      • Weatherstripping around two downstairs doors
      • Deadbolt on "utility door" to replace present 1" hole
      • Insulated board for small window on south corner
      • Still a little caulking/plastering above the south wall and in the closet area on the southeast corner
      • In the event of warm weather, the most urgent mortar replacement work

    • Big house
      • Urethane in obvious holes in basement walls (mortar later)
      • Boards over vents under first back addition
      • Board up two basement windows on east basement

  3. Gutters, sometime prior to the spring thaw

  4. Carriage house bathroom
    • Attach and plumb vanity

  5. Carriage house electrical work
    • Replace stolen ground wire outside
    • Overhead light for washer/dryer area
    • Separate circuit for bedroom to permit use of air conditioner

  6. Carriage house paint and trim
    • Paint walls and trim in bathroom
    • All window trim

  7. Equipment closet in big house
    • Reroute incoming DSL into closet in dining room
    • Add an electrical outlet there for the Linux box

  8. Carriage house garage area
    • Remove superfluous fiberglass insulation (40% complete)
    • Still some miscellaneous plaster, and more paint, aye!

  9. Dining room
    • Remove and scrape wallpaper (30% done, thanks to daughter)
    • Remove all damaged plaster on walls
    • Remove damaged drywall from ceiling
    • Restore plaster on walls
    • Drywall ceiling
    • Paint (I'm still liking that semi-gloss ultra white)
    • Clean and maintain the woodwork and buffet
    • Shore up under floor (soft spot from long-standing leak in roof fixed in 90's)
    • Polish floor

  10. Carriage house kitchen window (after spring has sprung)

  11. Remainder of big house

    • Upstairs bathroom plumbing
    • Addition of sink in kitchen
    • Cleaning
    • Electrical systems: oh the humanity!